
Easter Bunny Nail Art Tutorial
Happy Easter! Well, soon to be Easter! I enjoy Easter as a rule because it is the first spring holiday and a great relief after all the snowy holidays. I love to see family and have a great meal together. And the weather means you can usually visit with a little less drama from the snowy weather. You could actually still ski if you wanted to. In fact I might actually try to sneak away just to do that very thing at some point. But not before we try this Easter Bunny Nail Art Tutorial on our finger nails.
What you’ll need:
Light/pastel blue nail polish
White nail polish
Pink nail polish
Black nail art polish (or black nail polish and a toothpick or thin paint brush)
Clear nail polish
What to do:
On clean and dry nails, apply 2-3 coats of blue polish. Let dry.
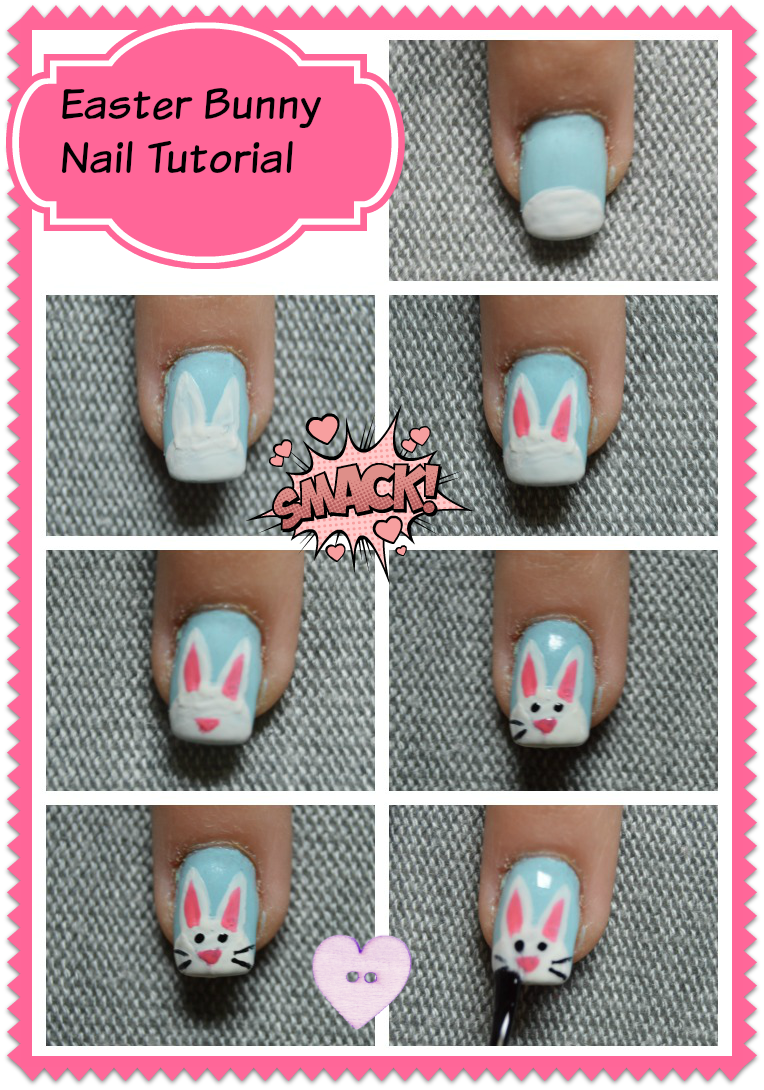
Make the bunny (As per collage pic):
Let dry between steps:
1-Using the white polish, make a semi-circle at the tip of your nail
2-Add the ears
3-Use pink polish and a nail art brush or toothpick, fill in the ears
4-Add the nose with pink polish and an nail art brush or toothpick
5-6Using the black, add two dots for the eyes and two lines on either side of the nose for the whiskers
7 Add a clear coat of polish
Although the white may look thick and “clumpy”, once you apply clear polish at the end, it evens out.
Happy Easter!


That is seriously cute. I just did Easter eggs on mine, but if they chip before Easter, I am totally doing this.
Adorable! I typically hate doing my nails, besides the plain old solid color once in a while I rarely do my nails but my daughter loves getting her nails done. I’m going to do this little bunny art work on her nails today!
How cute! I normally don’t even attempt nail art, but I have to try this. Hopefully I don’t mess up too bad! Your simple instructions should make it easier.
This is something I’ve never seen before. Too cute. Of course you make it look simple and I am sure my bunny would look twisted.
Now that is cute! I love those nails 🙂
That turned out really cute. Doesn’t look too hard to make either!
Aww I love it! I can’t believe you were able to include all the tiny details! That is so fun!
My daughter would love to do this! She’s totally into decorating her nails. She’s 13!
This is super cute. I bet my daughter would love this on her nails.
That is so adorable. I think this is worth trying even though I’m not a steady hand.
That is so cute! Now I need to get my nails to grow so I can have cute nails too!
This is so cute! I’ve tried so many tutorials, but I’m never good at nail art. 🙁
Oh how cute! I wish I had the long wonderful nails for this. My girls too how cute and fun!
This is super cute! I fail every time I try to paint my nails myself. Lol
These Easter Bunny nails look so cute. I have a friend who always paints her nails with themes matching the holidays. I’m going to share this with her.
I wish my daughter’s nail beds were long enough to do this. Super cute.
Those are adorable! I like Jamberry for quick nail design but I LOVE your creativeness.
This is so fun! (and cute!) I wish I actually had nails to decorate (never been able to kick my bad habit of picking them short).
Ok that is too cute!! Would love to do that with my nails. Sadly, they would end up looking more like Easter rats I think. Especially with my “bad” hand. Thanks for sharing!
This is the cutest nail tutorial ever! It even looks like something I can do, I may just try this!
It’s pretty easy and we are getting good at them…
What a great idea! I know I could do this on my left hand, but my RIGHT HAND?!?!? lol I’m not talented enough!
So cute! i would never had thought it would be so easy to paint on nails
Super cute idea! Thanks for sharing.
So cute! I bet I would not get the same results. I will try it on my daughter’s nails though, I bet they would look great! Thanks for the step by step instructions!
Hi! Stopping by from the Creative Spark Link Party. This is SO cute! Thanks for sharing!
My daughter saw this picture in my FB feed the other day and just about jumped out of her seat and said “MOMMA!” Sadly none of us have long enough nails.
Cute idea! Featured at our Sunday Features party this week. Thank you for linking up with us last week and hope to see you partying with us again. Sharing this week and pinned!!